POSSUM NEST BOXES
|
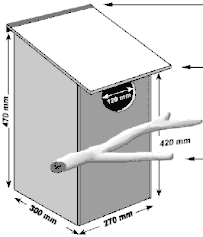
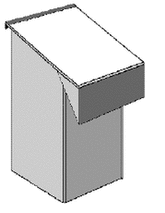
The Brushtail Possum Box
The top edge of the roof should be weather sealed with a folded strip of sheet metal, aluminium angle or a rubber flap. To stop rain getting in the lid should overhang by around 120mm. The entry hole should be located directly under the eaves and be between 110mm to 120mm wide. Ringtail Possum Box
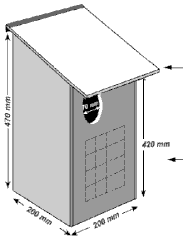
Is basically the same design as the Brushtail possum box. It is slightly narrower and the entrance hole is 70mm to 80mm wide. Sugar Glider Box
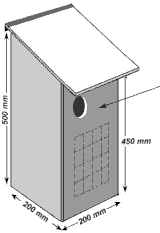
Although the Sugar Glider is one of the smaller possums, its nest box is quite large. However the entry hole (which would probably be a little higher up than this diagram illustrates) is only 40 mm wide. |
Possums in your garden - not in your roof!
You can buy ready-made boxes online, but here are some basic instructions for those who prefer to make their own. There are boxes for various types of possums. This design suits brushtails, ringtails and sugar gliders. For others we recommend the 'Nest Box Book' published by the Gould League of Victoria. What you need Use a building materials that are hardy and provide a level of insulation from the heat and cold. Timber: You can use any timber you like, except chipboard (which disintegrates rapidly outdoors) or treated pine (which is toxic if gnawed on by the possum). 12mm plywood or untreated pine is excellent. These are reasonably hardy, and not too expensive (ask your local timber yard or cover sheets or seconds). The wood needs to be at least 10mm to provide insulation. Fastenings: Use screws and glue to hold the construction together. They will last much longer and hold greater weight than nails. Something to seal the top edge of the box: Sheet metal, piece of aluminum, a rubber flap or piece of old inner tube will work.
Optional extras
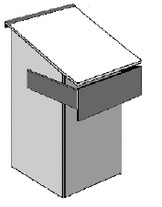
How to build your possum nest box Box top While it is not essential, it is best if you can arrange the top so it can be opened for inspection, but latched closed for protection. Fasten the back of the lid to the back with an old inner tube, which provides 'hinge' and a weatherproof seal. To stop rain getting in, the top should overhang by 110-120mm. The entry hole should be located directly under it. Box bottom The bottom of the box should fit inside the four sides and be screwed in from the side. This gives greater strength than if flush with the walls and screwed in from the bottom. Drill at least four x 5mm to 7mm holes near the corners for drainage. Baffle The baffle is a screen that hides the entrance hole from view. It stops direct sunlight entering the box and reduces the effect of wind and rain. The baffle also stops Mynas and Starlings from occupying the box, as they will only choose hollows where they can fly directly into the hole. The baffle is simply a piece of wood, the same width as the front of the possum nest box, with 'arms' to fix it to the box or lid. The baffle can be made of any thickness, as its main purpose is to provide screening and it should be large enough to cover at least 90% of the entrance hole. There are various ways baffles can be attached. As possums may decide to hang on to these and have to brush past them every time they enter and exit, make sure they are securely fastened. |
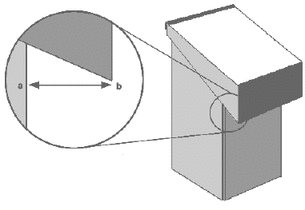
The distance of the baffle from the front of the box (a to b in the diagram above) should be at least equal to the diameter of the entry hole. As the possum needs to climb under the baffle, the clearance has to be big enough to let him through.
Finish
The wood does not have to be smooth as possums are used to roughing it. However, a good coat of sealant and/or UV resistant paint on the exterior will help the box last years longer. Be sure to seal the edges, as that is where the water gets in and damages the box.
Ladders
A small branch fastened firmly inside and outside under the entrance hole will give the possum something to grab onto while entering and exiting his home.
|
Placement and installation
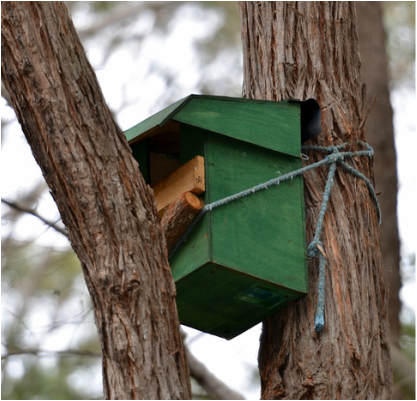
The box should be at least 4 meters from the ground, to provide protection from pests and a bit of privacy. The box should face away from prevailing winds and should not face towards the afternoon sun. If it is not possible to avoid both the winds and direct sunshine, having a baffle attached will help. Hang your nest box using sturdy wire or chain secured to the back of the box. Sheath the wire in old hose pipe to prevent damage to the tree. Attach the bottom using a flexible metal strip approximately 30 mm from the bottom of the box, and nailed to the tree with a couple of heavy gauge flat head nails. Don't drive these nails in all the way, allow for the growth of the tree and the possibility of relocating the possum box in the future. Moving the possum into his new home Don't let the possum near his new home until the paint smell has disappeared. If you already have a possum in captivity, let him get used to the box before transferring to the tree. If you are trying to attract a possum, you can put some fruit in the box, but remember to take it out before it goes off. Few good homes won't remain empty for long if there are possums in the area. Download our ‘Build a possum nest box’ brochure (275kb PDF) |
This page last updated February 2022

